
![]() Greetings to No.4 of my FlashPunk tutorial series! As announced in the previous ones, I’m going to show you this time how to have your avatar moving from one map to another, and also how to finally enter that house we placed in tutorial 2. your avatar current is. The complete code for the previous tutorial is here, and the one for this tutorial is available here.
Greetings to No.4 of my FlashPunk tutorial series! As announced in the previous ones, I’m going to show you this time how to have your avatar moving from one map to another, and also how to finally enter that house we placed in tutorial 2. your avatar current is. The complete code for the previous tutorial is here, and the one for this tutorial is available here.
Step 1 is, of course, creating a map using OGMO. We’ll actually create 2 maps. First, make a new map using the outdoors_map_settings.oep file from tutorial 2. It’s inside your “assets/maps” folder. Make it look different from the first map (maybe a stone tiled map?). The same rules apply as stated in tutorial 2. To refresh: the grid layer is there for you to set the tiles that must be obstacles to the player, which are for example the places where you put houses or trees. My map looks like this:
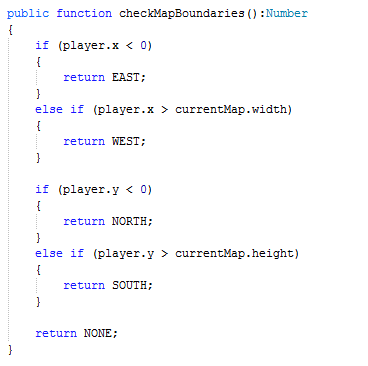
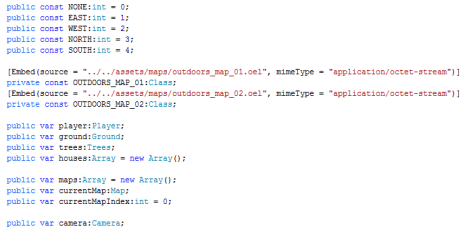
In the code, we are going to want to be able to walk to that other map by walking beyond one of the 4 map boundaries. For this, we’re going to need to check in the update() function if the player’s position is beyond one of the map boundaries. That function then needs to return the direction the player went: east, west, north or south. If the player didn’t leave the map, then return a value for that also. We’ll also create 4 constants that represent the directions in our code. Check them out:
Here’s the function:
It’s really self-explanatory isn’t it? Before I go on showing you how to use that return value, we’ll need to do some code-housekeeping. Let’s create a helper class that keeps all releveant data for a map, so that we can store instances of that new Map class in an array in the Game world for each map we have. Create a new class inside your “utilities” folder called Map.as:
As you can see, we’re storing map related data here. The the embedded resource class, the xml that we take out of that, a string with the name of the map, the width and height and an index. The index is used to store the location of this map in the array we’re going to use in the Game world to store all the maps we’re including in the game. In the constructor you should recognize the procedure of converting the byte stream into an XML instance. After that, we just read the width and height in the xml and store them in the respective class variables. Ok, now let’s see how we’re using this new class in the Game world.
Of course we’ll start with the usual: embedd the new oel map into the Game world and create a constant (or variable) of type Class to store. After that, we’ll create an array called “maps” that stores our shiny new Map class instances, as well as a variable called “currentMapIndex” of type integer, so we can always know which one of the map instances in the maps array is currently being shown in the game. I’ll throw in a single instance of the Map class which is set to be maps[currentMapIndex] whenever we’re changing maps. We’ll call that “currentMap”. Because we’re now keeping the width and height of a map inside their own instance, we’ll say goodbye to the two variables “mapWidth” and “mapHeight”. Here are the new property variables of Game.as:
So, where were we? Oh yeah, we were gonna switch maps when the player either went north, south, east or west and if there was a map in the direction. But with those changes we just made, we’ll first have to:
a) instanciate and initiate the maps and the maps array and
b) fix up the loadMap() function to load a map properly at all!
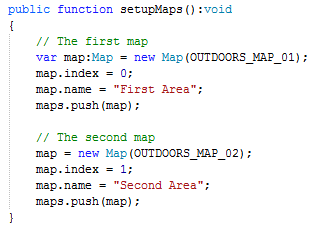
Add this function called setupMaps():
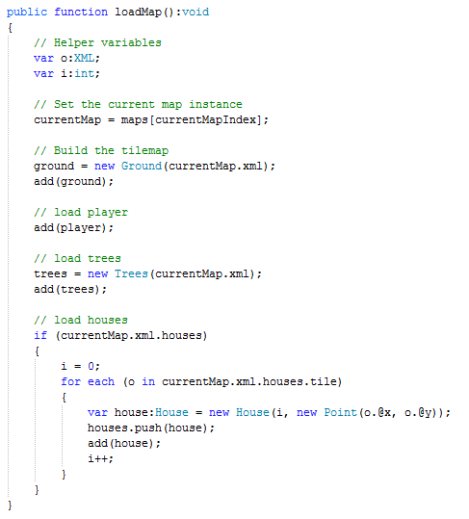
You’ll want to call this function in the Game worlds constructor, before the loadMap() function. As defined in the Map class, we just need to pass the byte stream into the constructor to do the most core things, but we also want to set the name and index of our map, and then push it into the maps array. To fix up the loadMap() function update it to be like this:
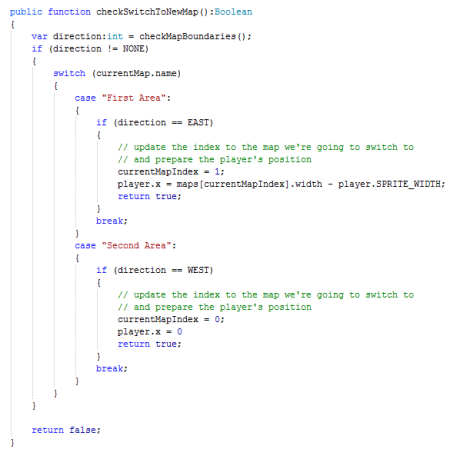
We delete the part with the byte stream conversion and instead just set currentMap to the element at index currentMapIndex from the maps array. This should be the 0th, as we set currentMapIndex to that value earlier. Everytime we need to get the xml of the map after that, we’ll serve it by giving it currentMap.xml. It’s easy. Now we can finally get to the code that actually switches maps. How can we do that? We can know at each frame if the player went beyond map boundaries thanks to checkMapBoundaries(), but we’re not going to call this function in there. We’ll write a new function that checks if checkMapBoundaries() returns something other than NONE, in which case we’ll check if there is a map in that direction from the current map. If there is, we’ll also change the player’s position, because he’s gonna be in another area next frame, so we need to make sure he ends up at the expected position. We remove all entities from the world (which doesn’t mean we’re killing them from memory), reload the map and adjust the camera.
Look at this new function:
And we implement the whole thing into the update() function:
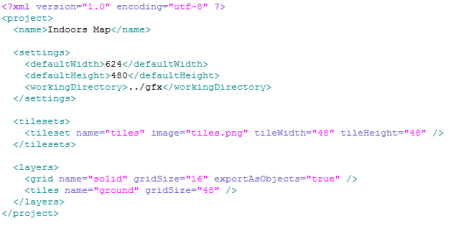
So yeah, we’re basically checking if the checkSwitchToNewMap() is true, in which case we have to load the new map (the index is already set, as is the player’s position). Before we load the map, we remove all entities, and afterwards, adjust the camera to focus on the player. Straightforward? Okay, now we can walk around from map to map. Let’s go into the houses! To do that, we need of course, a map for the inside of the house. We could use our old settings oep, but those houses really don’t look like they could contain an area of 1248×768, do they? Nope, we’ll create a new
settings file, with the smaller dimensions of 624×768, which is the size of our flash player window.
We also don’t include a trees layer. Create an indoors map now, but notice a difference here. We set the gridSize of the grid layer to be 16×16 pixels per square. We can now make finer collision areas, which I will use to create sort of a frame around the room. Also notice that I’m not using the entire space available to fill with tiles. You are free to do what you want. My ground layer is like this:
The black frame is the grid layer’s rectangles. Anyways, we will load this new map into our code now. Do the same stuff for this new map as you did with the previous map. (Embed, create Class object, set values in setupMaps, push into maps array..) We are also going to make some little changes. First, let’s add a boolean variable to the Game world that
is true if we’re indoors, meaning we have an indoors map loaded. Also, we’ll add a House instance, so that we can access the house’s information comfortably when we’re indoors. Here is the pre-constructor part of Game.as:
And the new setupMaps():
The next change is in the loadMap() function. Remember that our indoors map doesn’t have a <trees> tag and layer. So we first need to check if there is such a tag in the map’s xml before we can try to instantiate the trees variable. For some reason, just checking for the tag doesn’t cut it, so we’ll just check if trees[0] is true.
Alright. Now…..checking if the player went out of the map boundaries isn’t going togive us a clue if the player went into the house. In this tutorial, going into the house means colliding with the house’s bottom edge, representing the action of walking through that door at the bottom. I hope this makes sense. We’ll need to add functionality to our checkSwitchToNewMap() function. Here’s the code (it became a beast):
Aside from checking if the player left to the north, south etc, we want to now make a collision check, namely if the player would have collided with the house if the player’s y coordinate had been a lower value (by like 3 pixels). We do this because actual collision with houses is being taken care of in the player’s movement code. If you think about it, this collision check will only return true if the player is bumping into the house from the bottome side. We also want to add a new index variable that stores the maps array index of the map that is the outside area of the house we’re entering. Call it outsideMapIndex. We don’t want to end up in the western area when we leave the house in the eastern area. It’s not a subway :D. And that brings us to the next problem. We want to add a special conditional in the checkSwitchToNewMap() function that checks if we’re indoors – because then, we’ll just switch back to the outdoor map whose index we kept earlier. Aand we’re done. We can now go between 2 outside maps, as well as go inside a house. You’ll maybe be wondering why I didn’t implement anything to allow us to walk into that second house on the western map. Well, if you really want to go in there, you can make your own implementation. You know how to do that now.
(As a side note: I’m aware that this code is really impractical with all this hardcoding. In a game with a lot of content, especially a JRPG, you will want to have a more modular, streamlined process of adding maps and their interconnections (what door leads to where, what direction leads to what other map etc). You would probably do that by making up your own scripting language, defining those maps and stuff in their own file written in that scripting language and then reading it in your own AS interpreter. I haven’t tried this yet, it’s only theory for me right now. If you know how to do that and care enough to point me in the right direction, or could even explain it to me yourself, I ask you kindly to do so. If need be, I’ll write a tutorial on that as well. For now, know that this IS a way of doing it, and it’s working, if only for the sake of learning how to do it.)
We’re not done yet. I have some dessert :)…
Let’s make a world map! My way of doing that is by creating an image in a image editor (GIMP is my favorite), that contains down-scaled images of the outdoors maps. Don’t go taking screenshots, OGMO has an awesome feature that creates an PNG image from your oel level! Open your outdoor maps in OGMO and select “Save Level as PNG”. Do this for both outdoor maps, and save the images anywhere you like. Then create a new image in your editor with dimensions 624×480. Paste the first outdoor map PNG and scale that to be 312 pixels wide. Keep the proportions intact. You should end up with a height of 192 pixels. I also like to add an alpha channel into the world map image, but it’s not a must. Move the newly pasted selection to the right side, centered on the 0-y axis. It should end up sorta like this:
Do the same procedure for the second map PNG, but place it on the left side. It’ll look like this:
Alright, one last thing to pay attention to here is that the x coordinate of the upper side of selections should be at 192. Next thing we’ll do is create a new Entity in the entities folder. Call it WorldMap.as.
That’s a simple class, innit? Just there so that we can store that image. Of course, we’ll have that image stored in “gfx” as “world_map.png”. In Game.as, we’ll create an instance of the WorldMap class and a boolean “worldMapOpened” that switches true or false, when we open and close the world map. We’ll then add 2 new properties to our Map.as, which contain the x and y offset of the map in the world_map.png file. So for example, for the first outdoor map, it would be 312,144. For indoors maps, we’ll be able to get figure it out with the houses x and y coordinate within the map, and the x and y offsets of the outside map within world_map.png. Here is the new Map.as:
And we set those worldXOffset and worldYOffset values in the setupMaps() function in Game.as:
We’ll also create an entity called WorldMapMarker.as inside “entities”, which is another placeholder entity class for this image:
Put it into the “gfx” folder and call it “world_map_marker.png”. Here is WorldMapMarker.as:
Okay, there’s some interesting computation going on in the constructor. First we set a variable we call the divisor. It’s basically the amount that we want to scale the coordinates we’re getting. Remember, in the world_map.png we scaled the map down by 4 (1248 -> 312, 768 -> 192). Then, check the parameter “indoors” whether we’re currently inside a house. If that is not the case, we take the player’s x coordiante, scale it down by the divisor, and add the world map offset of the current map and boom, there we have the x coordinate for the marker. Next, we do the same thing for the y coordinate, only with y offsets and heights. If we’re in a house though, we are going to take the house’s x and y positions instead of the player’s. That’s why we are gonna have to pay attention when we call this function and setting the paramters. This is teh final Game.as (behold its glory!):
Okay it’s 2am and I would like to wrap this up. We added 3 variables as class properties: the world map, the world map marker, and a boolean that lets us know anytime if the world map is opened. Then you see a change in the update() function. We’re only doing the usual stuff if the world map isn’t opened – no scrolling, not checking for switching maps etc when the world map is opened. We are calling a new function called “processGeneralInput”. If you look near the bottom, you’ll understand that this function checks whether the “m” key has been pressed and if the world map is not yet opened, in which case, it calls the new “openWorldMap” function. It checks if the Escape key has been pressed and if the world map is opened, it closes it again. So, let’s take a look at those 2 functions:
Predictably, we’re setting the boolean to true when opening the world map. Then we remove all entities from the stage and instantiate the worldMap object. If we’re indoors, we call the worldMapMarker constructor with the enteredHouse object as parameter. If not, then we give it a null value. After all of that, we’ll place the camera back at 0,0 and the worldMap itself as well, to be sure. Then we add the worldMap and worldMapMarker entities to the stage. In the closeWorldMap() function we set the flag back to false, remove the 2 entities from the stage and call the loadMap() function. We then focus the camera back on the player. But wait! How can we just simply call the loadMap() function without setting the currentMapIndex back to the previous one? Because we never changed it. Remember, we didn’t move from one map to another, so al the previous state variables were still the same – the player position, the currentMapIndex and so forth.
My god, I’m tired. Lol…I hope this tutorial was helpful. I even more hope that you give me feedback on what to improve, (or if you find bugs) and maybe how I can employ scripting in AS3 to make the code more flexible. Next time, I’ll show some basic text displaying and we’ll add an NPC to the stage, making it walk around…..with A* Pathfinding! It’s gonna be epic! But for now…good night!
(Get the entire code of this tutorial here.)






Just wanted you to know that I really appreciate your wonderful tutorial series. I have learned a lot and am truly grateful for all your hard work. I eagerly await future sections.
May I humbly suggest such fun things as quests, stats (str, int, dex, hp), inventory, battles, experience (levelups), status effectors (speed potion, spells, armour), NPC dialogue trees for multiple choice discussions… oh heck I suppose the sky is the limit. =)
Anyway I just thought you should know that your work is very much appreciated and respected.
Hi McFunkypants, all those points you named are on my list already (it’s a JRPG engine lol). Right now, I’m pretty much concerned with the most basic features, and trying to make the foundation a good one, so that things like quests, stats, combat, inventory etc won’t go corrupting the code base and that at some point the code just gets so horribly jumbled up that I have to shamefully stop writing tutorials :P.
Thanks for your praise, I appreciate it and am very glad the tutorials are helping people out, even though things aren’t always optimum
The link to code of this tutorial isn´t working
hi very thanx to you but how to download code? i want to try this…
oh, just noticed that the links are dead. I’ll try to provide you with a good link soon
AWESOME TUTORIALS!!!!!!